There is plenty of good information on how to create a bootable Ubuntu USB stick drive. What I will explain is not only how to do this easily but also be able to make copies thereafter.
This guide will focus primarily on how to do this on Windows although this will be vanilla enough to work on Linux as well. The Windows versions the following instructions will work for are Windows 7+.
Before we start, here is what you will need:
- System: 1GB free memory, More than 1 processor, 64 bit OS, ~30 GB free space
- Windows 7+ (this should also basically work for Linux)
- an internet connection
- At least two identical 8+ GB USB stick with USB 2.0+
- A basic knowledge of Ubuntu OS. Like you know what ‘sudo’ means.
- Know how to boot your system using a bootable USB
- About an hour depending on system speed
First, let’s download Ubuntu. Select the desktop version and for our purposes the current version is 18.04.1 LTS. While the download is happening let’s move on.
Next, we need a way to install Ubuntu to somewhere and then start creating bootable USB stick drives. This is the old chicken and the egg problem. In order to make bootable Ubuntu USB drives you must first have a running version of Ubuntu. We will now remedy this issue.
Vmware Player
Let me introduce our chicken, VMware Workstation Player. We will create a Virtual Machine (VM) of Ubuntu. Go ahead and download the free version (version 15) of Workstation Player for Windows. Note, there is a player for Linux and the rest of the guide should apply to Linux as well. Once download is complete, go ahead and install.
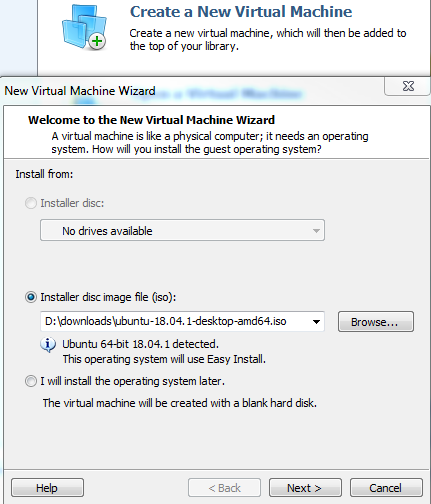
Time to get a VM of Ubuntu up and running. Start up the player and select ‘Create a New Virtual Machine’ or similar language that means new. You will now be able to select the Installer Disc Image (ISO) of Ubuntu you downloaded previously. Select to install from the ISO option and point to the Ubuntu ISO.
Something like this:
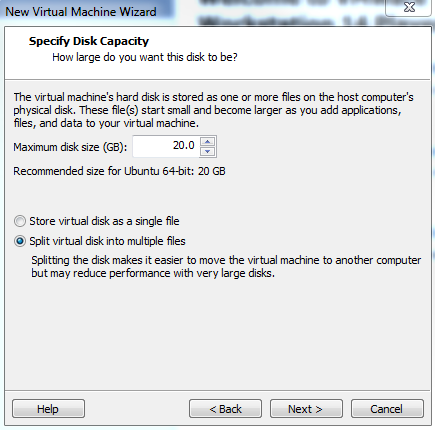
The next few steps will ask for some basic info like username, VM name, VM location. Enter this information over a couple screens. When you reach ‘Specify Disk Capacity’ I have some suggestions. We will install a minimal version of Ubuntu. The minimal version fits easily on 8GB but we will want room for some of our USB cloning. My suggestion is no less than 20 GB.
Something like this:
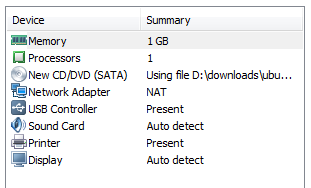
Clicking Next you will arrive on the screen to create the VM. But before you do, click on ‘Customize Hardware.’ My suggestions are: Memory=1GB, Processors=1. More importantly, make sure you see a USB controller is present. I’m not expecting problems.
Something like this:
When done customizing the hardware, return to the final screen and select ‘Finish.’ This will kick off the Ubuntu install. I suggest installing the minimal Ubuntu version if you can. Minimal install will leave off office software and other applications. You can always add any software later. Last, you will be prompted at some point to install VMware Tools. You want to do the tools install.
If all has gone to plan, you should be happily logged into Ubuntu and looking at a bionic beaver desktop.
Something like this:

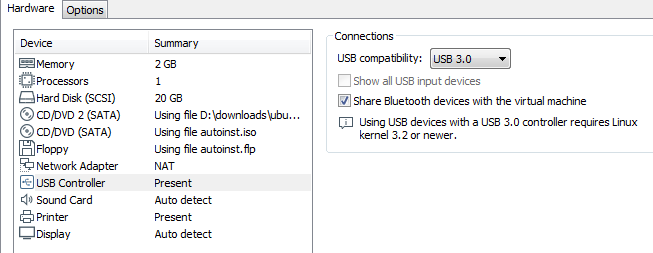
One quick thing to check is the USB Controller hardware settings under the VM settings. If your computer can do USB 3.0 you may want to set the controller to USB 3.0. By default it is set as 2.0.
Something like this:
We will need access to the Ubuntu ISO you downloaded earlier. We can either create a share to your hard drive or simply download the Ubuntu ISO to your current Ubuntu VM. The share is a good way to share files and give yourself some extra disk space. The share can also be another vector for infections to creep to your non-VM OS. If you do not want to create the share then download Ubuntu to your VM and skip ahead.
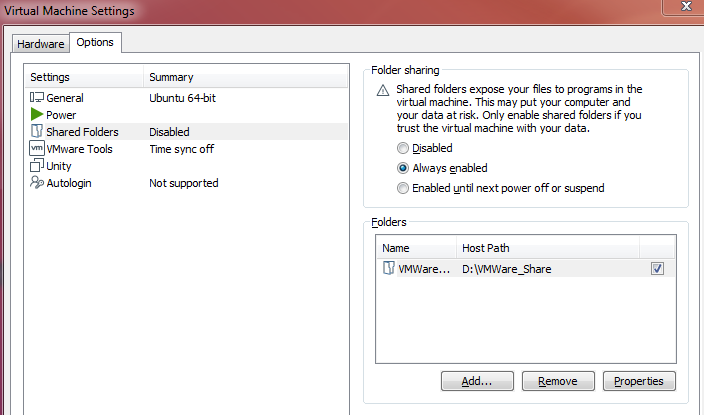
You want to make a share? Create a folder you will use for your share. This folder’s contents will be available to both your VM and other OS. We will once again go to the VM Settings (Player > Manage > Virtual Machine Settings). Select the options tab and then Shared Folders. Set from ‘Disabled’ to ‘Always enabled’. Add your folder under ‘Folders.’
Something like this:
Now that the shared folder is enabled, restart the VM to see your folder (Player > Power > Restart). If the shared folder does not show up thre could be many reasons. VMware Tools is not installed, etc. The host system must have VMware Tools installed in order to make them available to the client system. If you were not prompted to install or have not yet installed VMware Tools you need to do that now. For other issues, here is a link I have found helpful to fix some of the shared folder issues.
USB Bootable Startup Drive and Installer
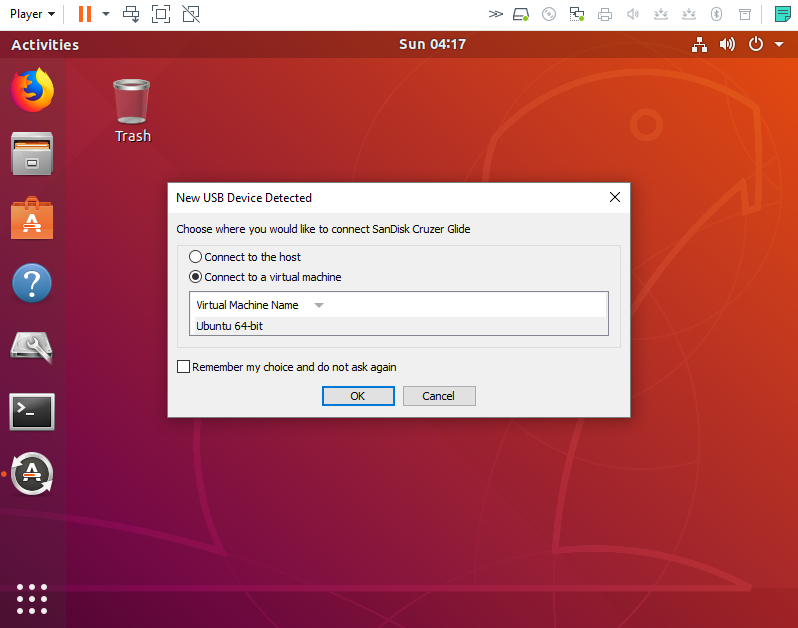
Finally, we are ready to make those USB drives. Our next step is to create a USB Ubuntu installer. With the Ubuntu VM running, plug the USB you wish to use into your computer. You should see a prompt asking where to mount the USB drive. Choose your VM.
Something like this:
There are a few things that can help get the USB connected if you are having problems. The easiest is to first format the USB drive using FAT filesystem. This will make the USB readable to the VM and help to get your USB mounted.
At this point you should have a mounted USB drive. If not, you can at least see the USB in the Disks application. In the Disks application, select your USB drive.
Something like this:
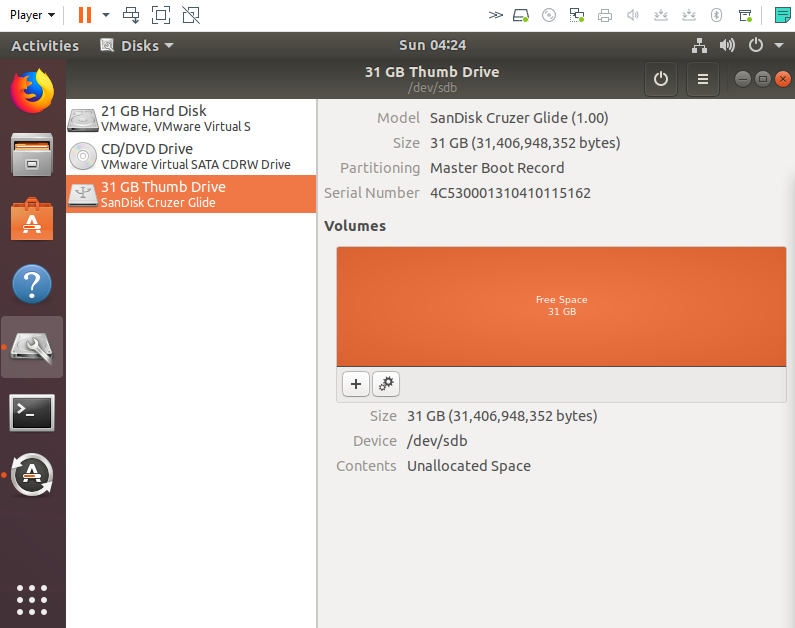
Now, if you have a partition on the USB drive, select the ‘-‘ button under Volumes and delete your partition. This gives us a nice clean slate for our work.
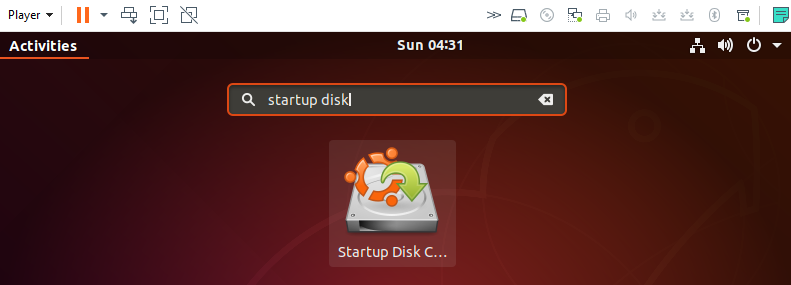
Time to make the USB installer. Ubuntu comes with a Startup Disk Creator. You can search for it in Activities should see the application.
Something like this:
Go ahead and startup the Startup Disk Creator. You should see your Ubuntu ISO select under ‘Source disk image’ and your USB selected under ‘Disk to use.’
Something like this:

If you do not see the ISO selected stay panic free for a minute. If you created a share to your ISO earlier simply select that location by select the ‘Other..’ button and navigating to the ISO. If you downloaded the ISO it should have autoselected because Ubuntu looks in your ~/Downloads for an ISO.
With your ISO selected and your USB disk selected go ahead and click ‘Make Startup Disk.’ You will be warned your USB will be erased and that is okay. Let the Startup Disk creation happen. Time for a beverage and maybe a snack.
When the creation is complete the fun begins.
Installing Ubuntu to a USB with a USB
Continuing with our chicken and the egg problem we have made a chicken (Ubuntu VM) but are missing a few eggs (Ubuntu USB). In the beginning I mentioned you should know how to boot your computer using a bootable USB. The Ubuntu Startup Disk Creator make a bootable USB installer. You now need to boot the system using the USB.
If you do not know how to do this (such as you never wildly pushed F12 during startup) then you will need to do some research on your system. Each bios is a bit different and each OS is a bit different on how they handle booting to USB. Unfortunately, I will not be covering this subject.
Really quick here are our next steps:
- Reboot using the Ubuntu installer USB
- Install Ubuntu to your second USB using the installer
- Test your install worked by booting with the new full version Ubuntu USB
- Reboot with your original OS that has VMware Player installed
- Start your Ubuntu VM
- Clone the full version Ubuntu USB to your VM
- Make as many USB copies as you like!
Rebooting to the Ubuntu USB installer you should see:
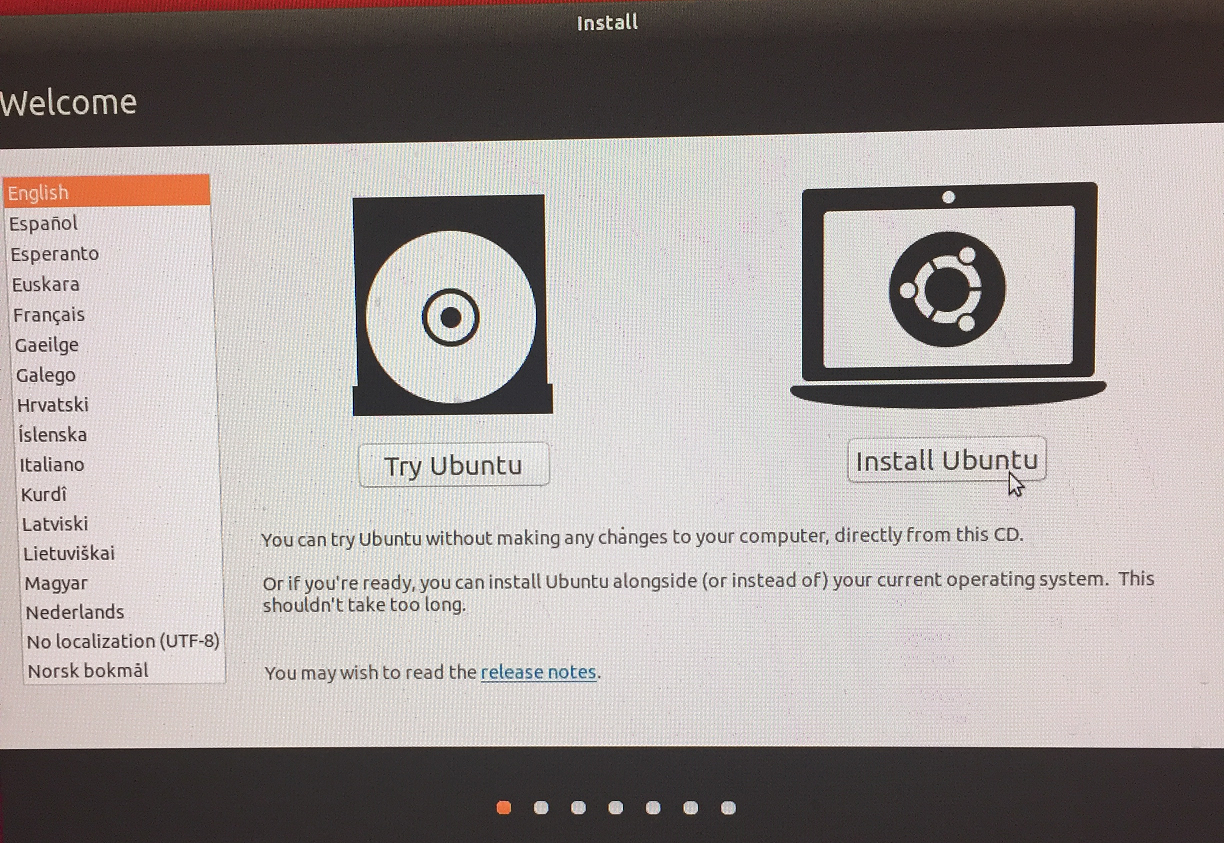
At this point, insert your second USB drive into a USB slot. The USB drive will be available later in the install. Select your language and click ‘Install Ubuntu’. There will be a few basic screens then this screen:
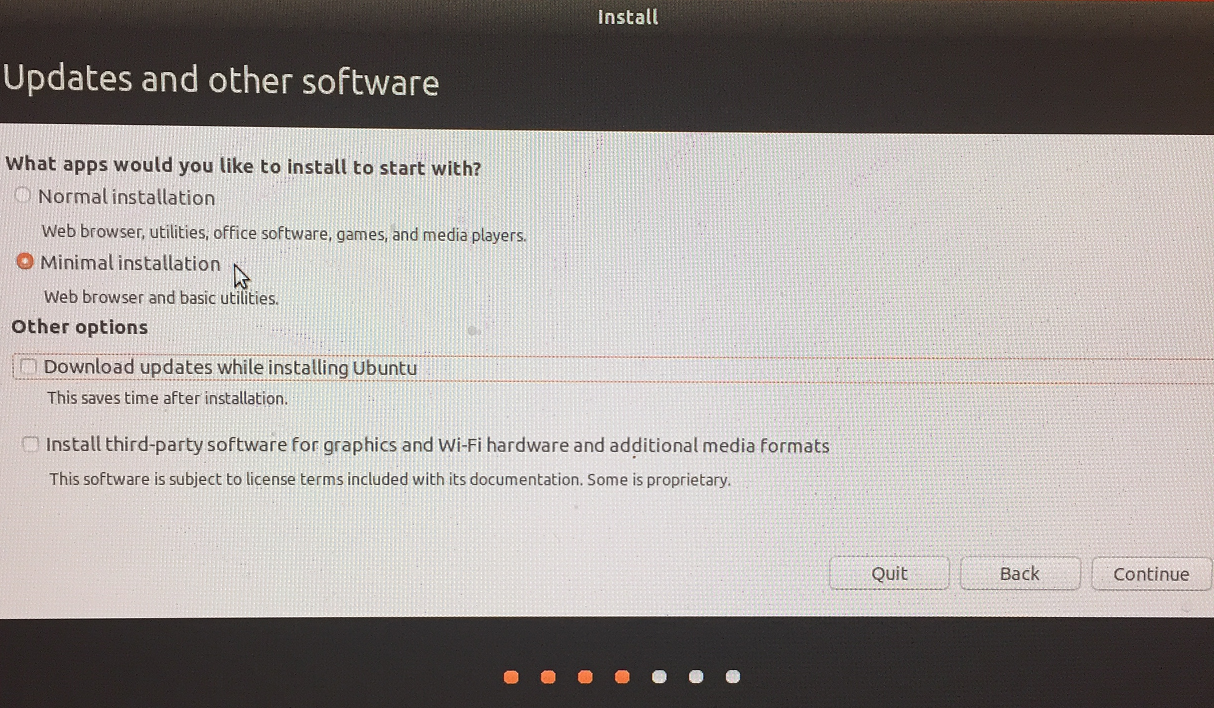
Select ‘Minimal Installation’ as this is the smallest install and will install quickest. Unselect ‘Download updates …’ to further speed things along. We can always add applications and do updates later. Click ‘Continue’ and off to the next screen:
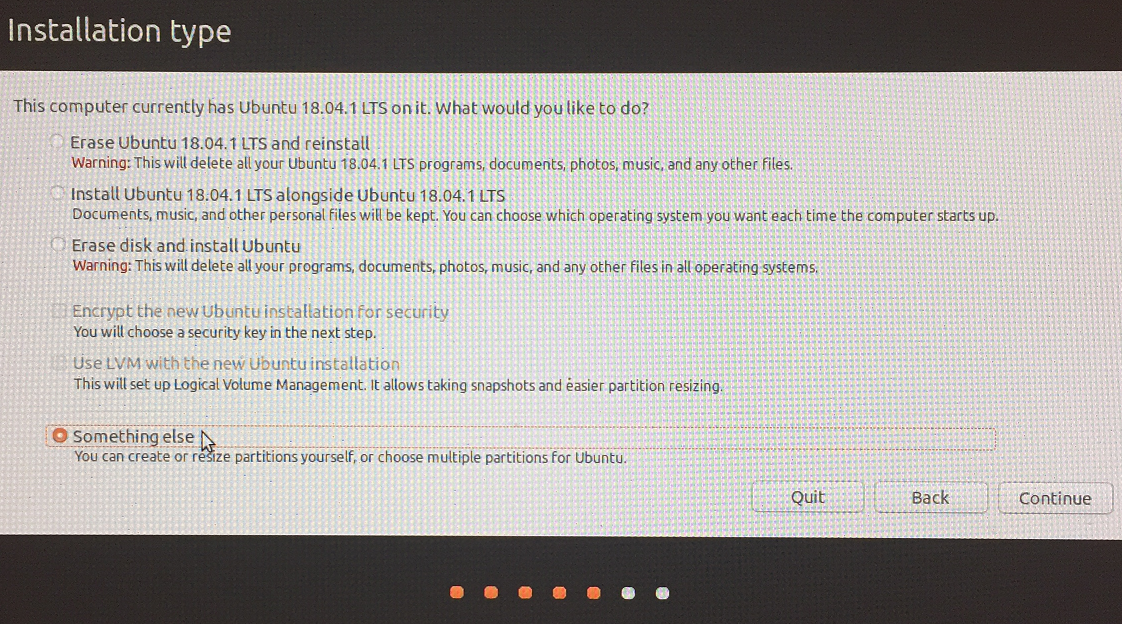
Choose ‘Something else’ as this will give us the most control over installation. Click ‘Continue’ and off to the next screen:
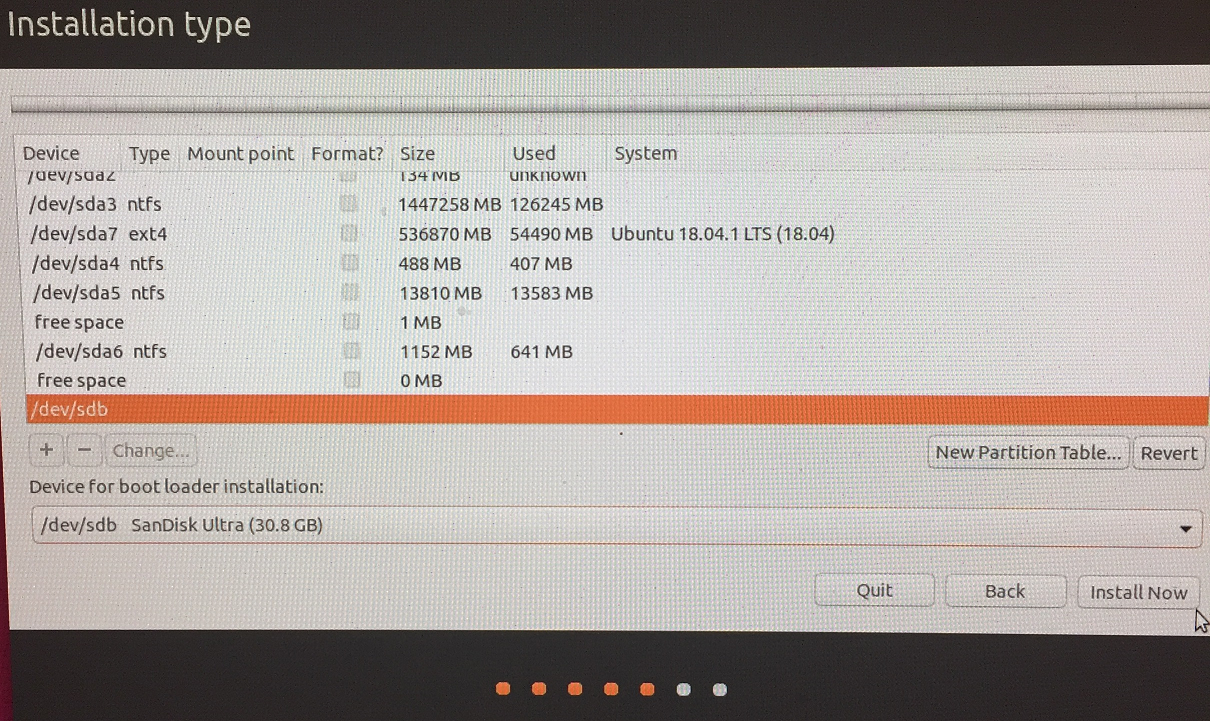
BE CAREFUL! You can install over any device shown. This includes your computer’s boot drive and OS. So, don’t do that. Instead, select your second USB drive that we want to install full Ubuntu on. It will probably be /dev/sdb or thereabouts depending on any other USB drives you have plugged in. Select your second USB in both the device list top panel and the boot loader drop down. Click ‘Install Now’ and install begins. When install has completed remove the USBs and go through a shutdown. Try out your new full Ubuntu USB and make sure things are working. Do some updates to the Ubuntu OS, etc.
Reboot back to your original system and we will do some copying of your new full Ubuntu USB.
Making Copies by Cloning
You should be all booted up into your OS with VMware Player installed. Go ahead and fire up the player. When your Ubuntu VM is running insert your full Ubuntu USB and mount it to the VM.
We are now ready to copy or rather clone the USB drive. The process of cloning will clone the entire drive with all partitions include boot information. This is why earlier I mentioned it is best to have identical USB drives. Identical includes the drive maker. The reason why is that not all 8GB USB drives have the same amount of available space. This means, cloning from 7.96 GB image to 7.95 GB USB will fail. If your second USB is larger than the clone image then you should be just fine.
Anywho, it is time to clone. Navigate to where you would like to clone the USB image to like ~/Documents for example. Now, determine the USBs device identifier using Disks application we used earlier . Should be something like /dev/sdb. And now we clone from the USB to an image on the VM’s disk. In a terminal run the following:
sudo dd if=/dev/sdb of=usbclone.img conv=sync,noerror bs=4M status=progress
While the clone happens let me explain the above command. We are cloning from device ‘if’ to image ‘of’ and we want to see the status so we add status=progress. The other parameters are data rate and cloning options.
When cloning is complete you will have an image of the fully bootable Ubuntu OS. We can now make as many copies to USBs as we need. To copy a clone to a USB is quite simple. Assuming your USB to copy to is /dev/sdb then in a terminal run the following:
sudo dd if=usbclone.img of=/dev/sdb conv=sync,noerror bs=4M status=progress
This could have been a bumpy road for some of you but if you made it this far you have created a repeatable process to make many copies of Ubuntu USBs. Congratulations to you as this is a fairly advanced guide.
If you found this guide helpful please think of providing a donation.
Resources
Here are helpful resources used to make this guide.
Ubuntu Tutorial: Installation from USB Stick
Ubuntu Tutorial: create a USB stick on Ubuntu