Swap pool is born! Swap uses a Cuckaroo29s PoW. We are excited to announce our second globalized mining pool this time for the Swap project. Formerly known as the Free Haven Protocol, Swap seeks to bring a fair, efficient and stable blockchain to the crypto ecosystem. See Swap’s announcement for more details.
We have learned much from our first foray into the blockchain and mining pools. Mostly, the crypto community is a passionate community. As passion goes Swap is about an 11 out of 10. We wanted to make sure we had solid well tested pools running the latest code. We are there.
At the very least, increasing interest in blockchain technologies is what is at the heart of Krunzy.com. As such, we pick new pools not necessarily by profit alone but what could increase interest in blockchain. As such, active development and emerging technologies with passionate discourse is imperative. Swap has all three.
Pools are but one part of blockchain yet very important. Mining pools should embody decentralization. As such, we believe pools should provide multiple geographic locations. Not just for low ping but to truly be decentralized. Each pool server runs as its own node. As such, we strive to launch to three pools each with their own node. Mining on the globalized node also ensures a smooth fail over if one of the pool nodes is lost.
Mining Nodes – mining endpoints to point your miner – low ping and stable Global – swap.mine.krunzy.com North America – Central US – us.swap.mine.krunzy.com Europe – Germany – eu.swap.mine.krunzy.com (available upon request) Asia/ Pacific – Singapore – ap.swap.mine.krunzy.com (available upon request)
NOTE: other mining stratum servers can be created upon request
We have explored the profitability recently of GPU coin mining on Amazon Web Services (AWS). But GPU mining is not the only way to get coins. Hey, what about CPU mining?
Glad you asked! There are some cryptocoins that are created to be CPU mined. The coin currently that is slipping in and out of most profitable is Webchain. Webchain has developed its own cryptonight alogrithym specifically targeted at CPU mining called CryptoNight-Webchain. The algorithm seeks to not only be CPU mineable but also deter GPU and ASIC mining. In other words, focus on delivering a coin mineable by just about any CPU on any device.
The Experiment
Determine if CPU mining in AWS could be profitable. Find the best combination of low cost, CPU power, and coin return.
Setup
As mentioned earlier, the test mined Webchain coin. The choice of Webchain was that it is specifically CPU mined and is one of the most profitable CPU mined CryptoNight coins.
I used webchain-miner to mine Webchain coin. This miner was selected as it is the miner Webchain created and suggests. Also, the miner is easily available and comes in several OS versions. The version used was the 2.6.2.0 linux amd64 miner.
The OS platform was Ubuntu 18.04. The OS was setup as I explained here. The webchain-miner application was downloaded from releases so no compiling was needed.
The webchain-miner was configured to use pool.webchain.network:3333 (variable difficulty) with no specific CPU configuration. Testing was across several types of instances with differing CPU. Because of this, CPU configuration was left as default or not set.
Finally, in order to auto run the webchain-miner when it loads the following was added to /etc/rc.local:
#!/bin/sh -e
cd /home/ubuntu/webcpu
./webchain-miner
Testing
AWS has many instance types with viable CPU configurations. To reduce the test base we made the first cut as we would not use a T type instance.
T type instances have the ability to boost beyond 100% CPU when under load. This would not be controllable and had one other serious and expensive downside. The T types when bursting incur $0.05 per vCPU-Hour. So, the cheap T3.Micro for less than a penny an hour just became a nickel. A >500% increase in cost when consistently at 100% CPU. So, T types are out.
What we wanted was a CPU work horse for a good price. To reduce the compute optimized instances more we looked at L3 cache size of the CPU. The L3 limits the number of CPUs that can be used for mining. The equation can be simplified to L3 cache / 2 = # of CPUs that can be used. So, 24MB L3 cache with 24 CPUs would only be able to use 12 CPUs to mine. This limited us to C type instances.
The C5 instance types have good CPU power with high network speed. Also, since C5 is relatively new the spot pricing is as much as 70% off normal price. The testing was performed on C5.18xlarge, C5.4xlarge, and C5.2xlarge.
Results
The following is a snapshot of each C5 testing run using the webchain-miner. Each snapshot shows the CPU info including L2/L3 cache and the number of threads webchain-miner used for mining. Also, hash rate is shown on the last line as Hash/second.
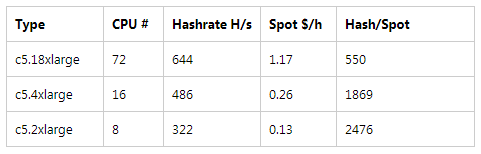
Table 1 shows CPU and hash rate as it relates to cost. A higher Hash/Spot is desired as it equates to higher hash with low spend.
Table 1
The C5.18xlarge had the highest hash rate but also did not use all its processing power. Th C5.18xlarge has 72 CPUs but was only able to utilize 12 CPU for mining. The reason is the L3 cache is 24MB which allows for only 12 CPU available for mining.
Similarly the C5.4xlarge did not fully utilize all its CPUs but had the second highest hash. Out of 16 CPU the C5.4xlarge was able to mine with 12 based on a 24MB L3 cache.
The highest utilized CPU was the lowest hash rate of the C5.2xlarge. All 8 CPUs were utilized. C5.2xlarge also is the least costly at $0.13/hour.
CPU utilization to cost is well shown in Table 1. C5.2xlarge is not only the least cost but also has the most utilized CPU. As hash to cost is concerned C5.2xlarge is the clear winner with a Hash/Spot of 2476 hash/hour/dollar.
Conclusion
The results were not unexpected as higher CPU utilization at lower cost converged on the least expensive most utilized C5 instance, the C5.2xlarge. Another finding during testing is the smaller C5.2xlarge have more spot availability. We were able to get some spot pricing as low as $0.08. We also found we could spin up 50 C5.2xlarge in one spot request. For $4 an hour you could spin up a hash rate of about 16 kH/s. But is it profitable?
Currently, Webchain is trading for around $0.005 but has been as high as $0.007 in the past 2 weeks. For now, we assume $0.005 is the coin price. As mentioned above, 16 kH/s is attainable for $4 per hour. In 24 hours we would spend $96 and make 2,395 WEB worth $11.55. A net loss of about $85. Obviously not profitable.
So, when would WEB become profitable to mine via AWS C5? Assuming cost does not change for AWS then the value of WEB would need to increase about 10x. Also, the difficulty should not be remarkably different then when the testing was run. With all those caveats, when WEB reaches one shiny nickel ($0.05) the break even point is reached.
Could WEB become profitable to mine via AWS and CPU? It certainly seems there could be a future convergence of WEB to Cost.
Hopefully you found this useful. Throw us a few coins to say thanks.
Anyone who has any idea about Amazon Web Services (AWS) pricing already knows the answer to mining profitability on AWS. Simply, it is not profitable at this time. But that is not why we are here. We are here to review an experiment I recently performed at AWS.
The Experiment
Find the sweet spot for running GPU mining tests in AWS. The sweet spot would combine GPU power with lowest cost. Classic cloud computing formulae.
Setup
I used xmr-stak to mine Leviar coin (XLC). I chose xmr-stak mostly out of familiarity but also because xmr-stak tries to optimize itself on startup when no configs are present. Something I will require in just a bit. Whereas Leviar was a coin that had a low difficulty in the Cryptonote v7 algorithm. I wanted enough hash rate to easily see differences. A heavier algorithm or greater difficulty would reduce hash rate as much as a factor of 10. Plus, I wanted some Leviar and they had a nice pool to see hash rates.
We will need an AWS machine image (AMI) with xmr-stak miner. When I checked the AWS Marketplace I found no such thing [DUH]. I was going to do it myself anyway.
Here is the base I used: How to Setup Ubuntu 18.04 for Coin Mining. I installed xmr-stak using the instructions on xmr-stak Git. The xmr-stak was configured for the Leviar pool. Important, remove any gpu and cpu configs created by xmr-stak. We will need xmr-stak to create new configs based on the EC2 instances we run the AMI on.
The last piece was to make an AMI of the fully functional Ubuntu xmr-stak miner EC2 instance. The AMI will be used to launch EC2 instances that we can test.
Testing
I chose to test p2, p3, g2, and g3 instance types. These are the only instance types that come with a GPU on launch. Also, all the types are NVIDIA and require CUDA for xmr-stak These can be fairly expensive so the goal is to run less than an hour. To keep costs low the instances were launched with spot pricing. All costs will reference the spot prices.
To test, a GPU instance was launched and xmr-stak started via SSH. Data was collected at 60 seconds. The pool settings were the same for all tests. Unfortunately I did not use a static difficulty but by 60 seconds the difficulties were about the same.
Here is an example xmr-stak config used for g2.8xlarge testing:
The results of the tests were about what could be predicted. More GPUs meant more hash rate. However, between the 2 series (p2, g2) instances and the 3 series (p3, g3) instances the GPU power were different. The 2 series use NVIDIA K520 GPUs whereas the 3 series uses NVIDIA Tesla V100 GPUs. In general the hash rate of the 2 series was 300 H/s and the 3 series was 412 H/s per GPU. About a 27% difference in GPU power.
CPU hash rates were counted as part of hash rate. Part of determining profitability would be to include all computing power. As such the g2, p2, and p3 instance types were within 10% difference in CPU power. Surprisingly, the g3 instances had low CPU hash rates and were over 60% less computing power.
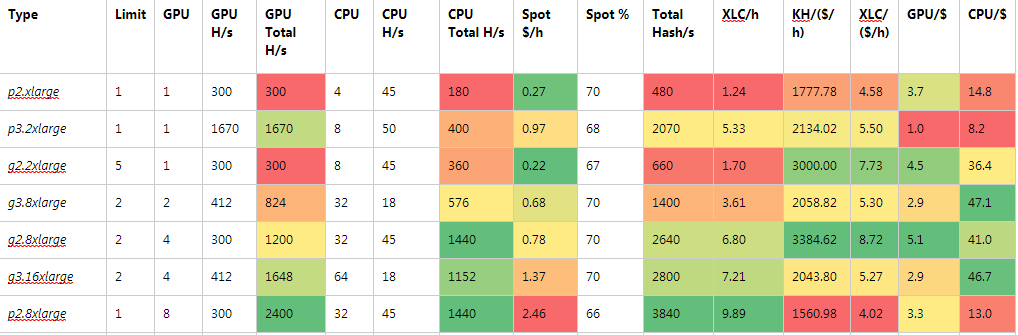
Table 1: Hash rates and costs per hash rate across instance types
Factoring compute power together with instance cost we get Table 1. The heat map shows favorable areas as green decreasing to red. The highest hash rate also belongs to the highest cost instance. The p2.8xlarge instance type had the highest GPU at 2400 H/s and tied for highest CPU hash rates at 1440 H/s. It therefore had the highest hash rate at 3840 H/s. With a whopping cost of $2.46/ hour.
The lowest hash rate belonged to the smallest instance, p2.8xlarge. It had a GPU of 300 H/s and CPU of 180 H/s. Although it also was not the cheapest instance at $0.27.
Knowing the highest and lowest performing instance types we will now look at hashing power per dollar spent per hour. This will determine our sweet spot of best spent dollars for the hash rate. Larger numbers are better. Our highest performer clocks in at 1560 kH/$/h. Basically, the cost is halving the hash rate per hour. The lowest performer ran at 1778 kH/$/h. In these cases the highest performer and lowest performer by hash rate scored lowest in hash compared to cost per hour.
Time now for the sweet spot. In Table 1, the best hash rate cost per hour goes to the g2.8xlarge instance type. The 4 GPUs and large number of CPUs with a sub dollar cost clinched the sweet spot title. At 3385 kH/$/h it is the best spent money to hash rate.
Or is it? The g2.2xlarge costs less than a third of the g2.8xlarge. This means 3 g2.8xlarge could run for less than one g2.8xlarge. Running 3 more instances would triple the hash rate but only to 1960 H/s. Still well under g2.8xlarge and placing it more towards the g3.8xlarge cost performance. The g2.8xlarge holds the sweet spot title.
We found the sweet spot, so how much can we make? The g2.8xlarge instance type can produce 8.72 XLC/($/h). Which means if I normalize to one dollar per hour I get about 8.72 Leviar coin. Leviar was about a penny a coin at the time of the test. So, for every dollar spent on running the instance we would get back 8-9 cents per hour. Not a good return even with bad math skills. In fact, to break even, Leviar (XLC) would need to be more like 10 cents per coin and cover most costs at 87 cents an hour. The issue is, when 10 cents a coin happens what is the difficulty and how would it effect hash rate?
Conclusion
Currently mining Leviar coin in AWS is not profitable. This is not to say a break even point could not be reached. However, if you are looking at break even you may just want to purchase the coin. If you are like me and think cryptocoins will see their day then mining may be worth while.
Certainly for testing purposes AWS is cost effective. I cannot afford a large rig and so can test my ideas in AWS in under an hour for less then a dollar.
And now some interesting math. At one dollar an hour you would spend $720 in 30 days and would mine 6,480 XLC. I bet you could buy a pretty descent GPU for $720. The point, it all depends on where you want to spend those dollars and if you want coins to HODL.
Hopefully you found this useful. Throw us a few coins to say thanks.
There is plenty of good information on how to create a bootable Ubuntu USB stick drive. What I will explain is not only how to do this easily but also be able to make copies thereafter.
This guide will focus primarily on how to do this on Windows although this will be vanilla enough to work on Linux as well. The Windows versions the following instructions will work for are Windows 7+.
Before we start, here is what you will need:
System: 1GB free memory, More than 1 processor, 64 bit OS, ~30 GB free space
Windows 7+ (this should also basically work for Linux)
an internet connection
At least two identical 8+ GB USB stick with USB 2.0+
A basic knowledge of Ubuntu OS. Like you know what ‘sudo’ means.
Know how to boot your system using a bootable USB
About an hour depending on system speed
First, let’s download Ubuntu. Select the desktop version and for our purposes the current version is 18.04.1 LTS. While the download is happening let’s move on.
Next, we need a way to install Ubuntu to somewhere and then start creating bootable USB stick drives. This is the old chicken and the egg problem. In order to make bootable Ubuntu USB drives you must first have a running version of Ubuntu. We will now remedy this issue.
Vmware Player
Let me introduce our chicken, VMware Workstation Player. We will create a Virtual Machine (VM) of Ubuntu. Go ahead and download the free version (version 15) of Workstation Player for Windows. Note, there is a player for Linux and the rest of the guide should apply to Linux as well. Once download is complete, go ahead and install.
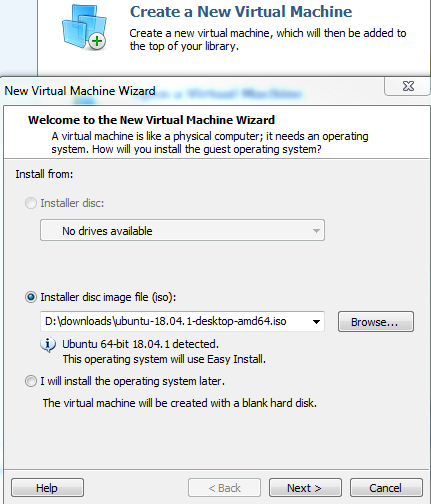
Time to get a VM of Ubuntu up and running. Start up the player and select ‘Create a New Virtual Machine’ or similar language that means new. You will now be able to select the Installer Disc Image (ISO) of Ubuntu you downloaded previously. Select to install from the ISO option and point to the Ubuntu ISO. Something like this:
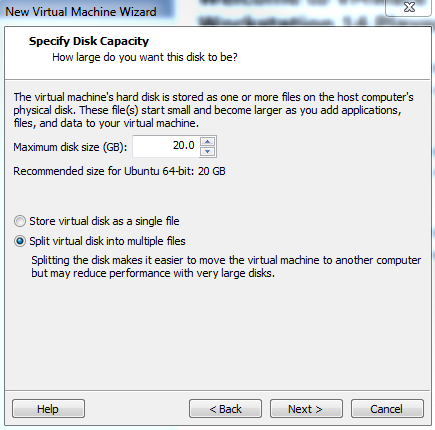
The next few steps will ask for some basic info like username, VM name, VM location. Enter this information over a couple screens. When you reach ‘Specify Disk Capacity’ I have some suggestions. We will install a minimal version of Ubuntu. The minimal version fits easily on 8GB but we will want room for some of our USB cloning. My suggestion is no less than 20 GB. Something like this:
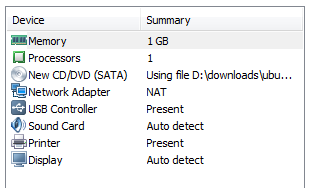
Clicking Next you will arrive on the screen to create the VM. But before you do, click on ‘Customize Hardware.’ My suggestions are: Memory=1GB, Processors=1. More importantly, make sure you see a USB controller is present. I’m not expecting problems. Something like this:
When done customizing the hardware, return to the final screen and select ‘Finish.’ This will kick off the Ubuntu install. I suggest installing the minimal Ubuntu version if you can. Minimal install will leave off office software and other applications. You can always add any software later. Last, you will be prompted at some point to install VMware Tools. You want to do the tools install.
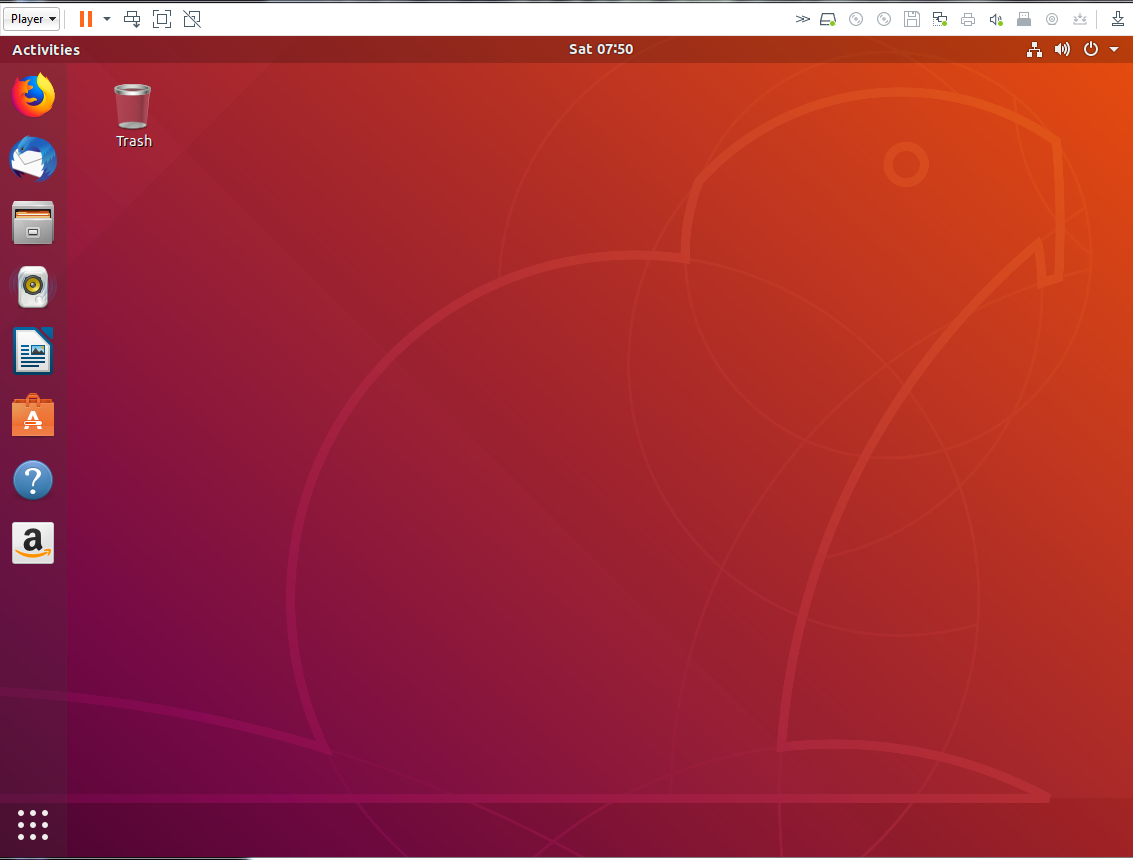
If all has gone to plan, you should be happily logged into Ubuntu and looking at a bionic beaver desktop. Something like this:
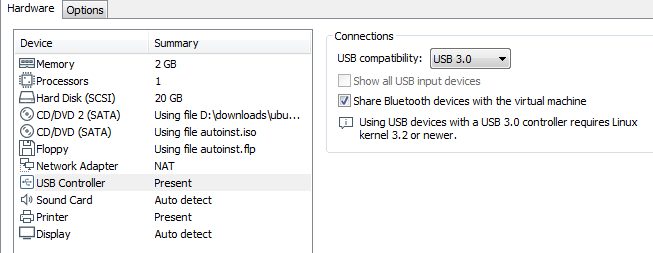
One quick thing to check is the USB Controller hardware settings under the VM settings. If your computer can do USB 3.0 you may want to set the controller to USB 3.0. By default it is set as 2.0. Something like this:
We will need access to the Ubuntu ISO you downloaded earlier. We can either create a share to your hard drive or simply download the Ubuntu ISO to your current Ubuntu VM. The share is a good way to share files and give yourself some extra disk space. The share can also be another vector for infections to creep to your non-VM OS. If you do not want to create the share then download Ubuntu to your VM and skip ahead.
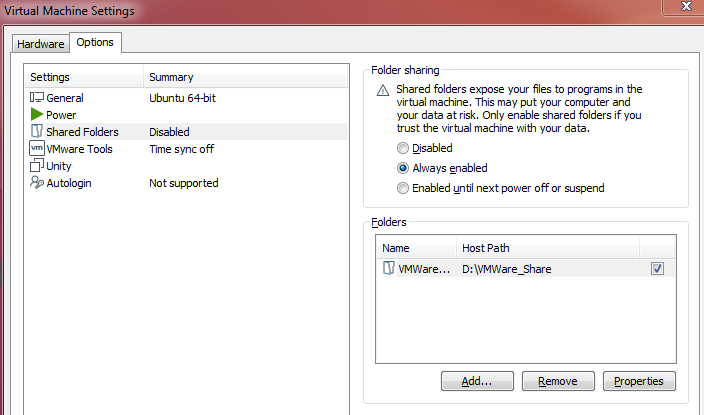
You want to make a share? Create a folder you will use for your share. This folder’s contents will be available to both your VM and other OS. We will once again go to the VM Settings (Player > Manage > Virtual Machine Settings). Select the options tab and then Shared Folders. Set from ‘Disabled’ to ‘Always enabled’. Add your folder under ‘Folders.’ Something like this:
Now that the shared folder is enabled, restart the VM to see your folder (Player > Power > Restart). If the shared folder does not show up thre could be many reasons. VMware Tools is not installed, etc. The host system must have VMware Tools installed in order to make them available to the client system. If you were not prompted to install or have not yet installed VMware Tools you need to do that now. For other issues, here is a link I have found helpful to fix some of the shared folder issues.
USB Bootable Startup Drive and Installer
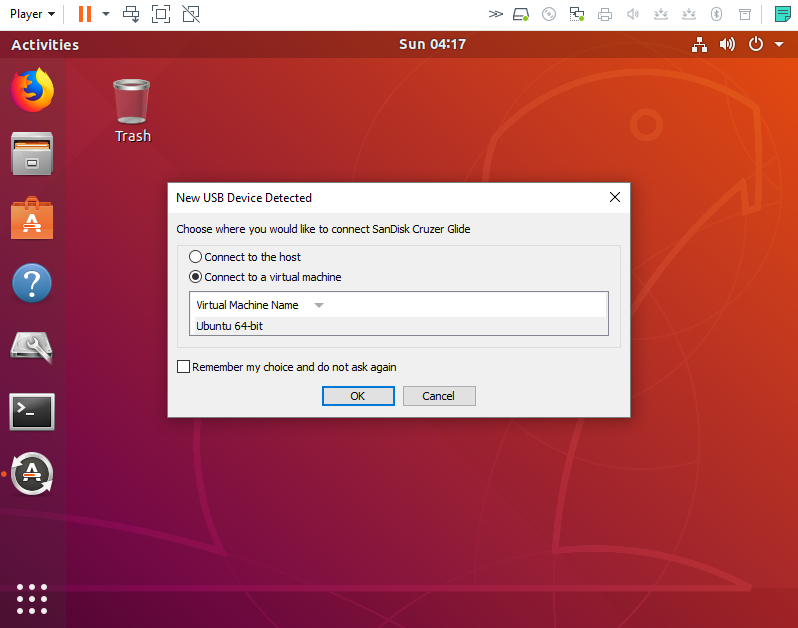
Finally, we are ready to make those USB drives. Our next step is to create a USB Ubuntu installer. With the Ubuntu VM running, plug the USB you wish to use into your computer. You should see a prompt asking where to mount the USB drive. Choose your VM. Something like this:
There are a few things that can help get the USB connected if you are having problems. The easiest is to first format the USB drive using FAT filesystem. This will make the USB readable to the VM and help to get your USB mounted.
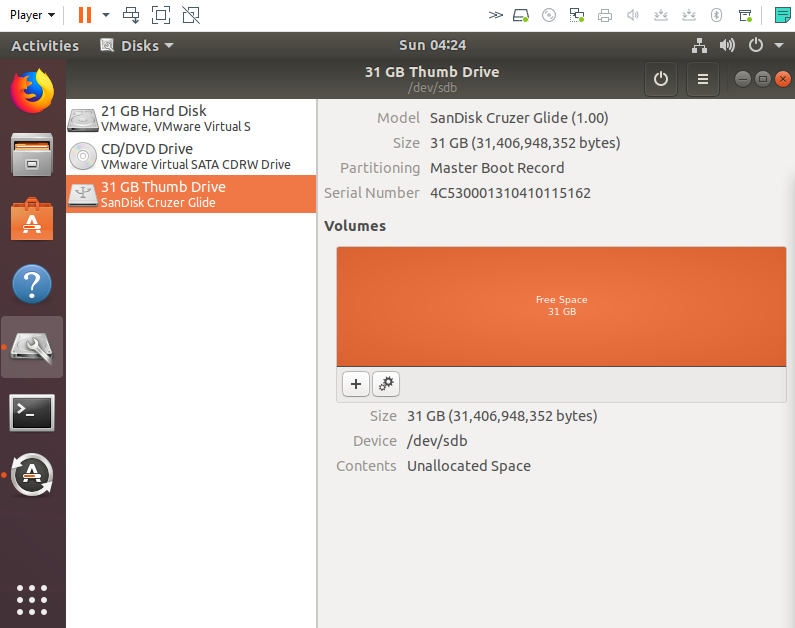
At this point you should have a mounted USB drive. If not, you can at least see the USB in the Disks application. In the Disks application, select your USB drive. Something like this:
Now, if you have a partition on the USB drive, select the ‘-‘ button under Volumes and delete your partition. This gives us a nice clean slate for our work.
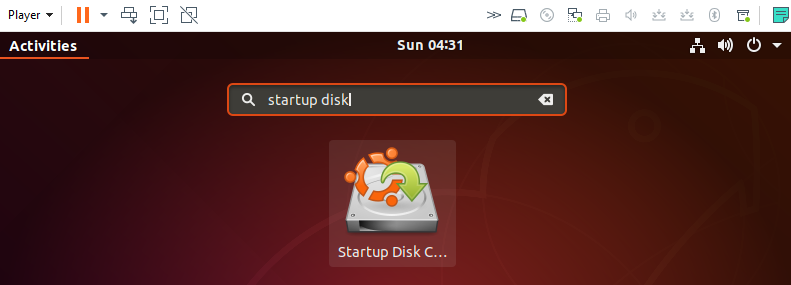
Time to make the USB installer. Ubuntu comes with a Startup Disk Creator. You can search for it in Activities should see the application. Something like this:
Go ahead and startup the Startup Disk Creator. You should see your Ubuntu ISO select under ‘Source disk image’ and your USB selected under ‘Disk to use.’ Something like this:
If you do not see the ISO selected stay panic free for a minute. If you created a share to your ISO earlier simply select that location by select the ‘Other..’ button and navigating to the ISO. If you downloaded the ISO it should have autoselected because Ubuntu looks in your ~/Downloads for an ISO.
With your ISO selected and your USB disk selected go ahead and click ‘Make Startup Disk.’ You will be warned your USB will be erased and that is okay. Let the Startup Disk creation happen. Time for a beverage and maybe a snack.
When the creation is complete the fun begins.
Installing Ubuntu to a USB with a USB
Continuing with our chicken and the egg problem we have made a chicken (Ubuntu VM) but are missing a few eggs (Ubuntu USB). In the beginning I mentioned you should know how to boot your computer using a bootable USB. The Ubuntu Startup Disk Creator make a bootable USB installer. You now need to boot the system using the USB.
If you do not know how to do this (such as you never wildly pushed F12 during startup) then you will need to do some research on your system. Each bios is a bit different and each OS is a bit different on how they handle booting to USB. Unfortunately, I will not be covering this subject.
Really quick here are our next steps:
Reboot using the Ubuntu installer USB
Install Ubuntu to your second USB using the installer
Test your install worked by booting with the new full version Ubuntu USB
Reboot with your original OS that has VMware Player installed
Start your Ubuntu VM
Clone the full version Ubuntu USB to your VM
Make as many USB copies as you like!
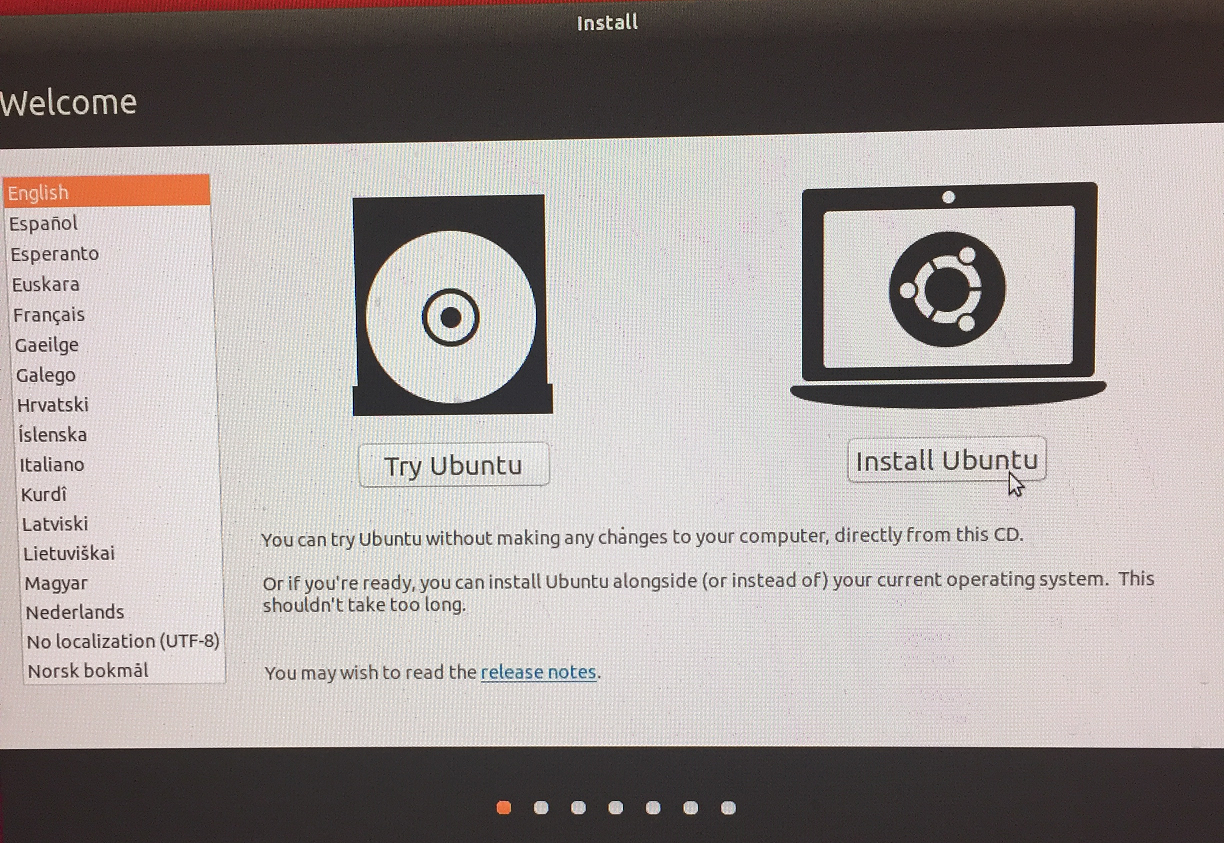
Rebooting to the Ubuntu USB installer you should see:
At this point, insert your second USB drive into a USB slot. The USB drive will be available later in the install. Select your language and click ‘Install Ubuntu’. There will be a few basic screens then this screen:
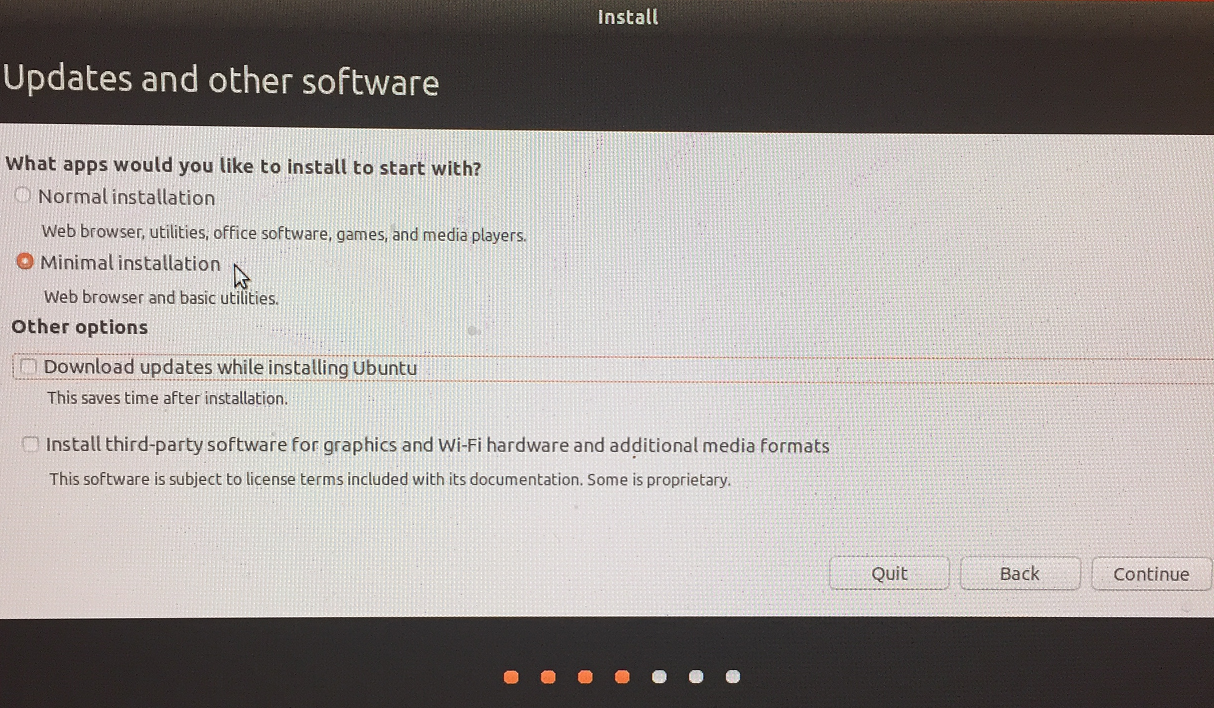
Select ‘Minimal Installation’ as this is the smallest install and will install quickest. Unselect ‘Download updates …’ to further speed things along. We can always add applications and do updates later. Click ‘Continue’ and off to the next screen:
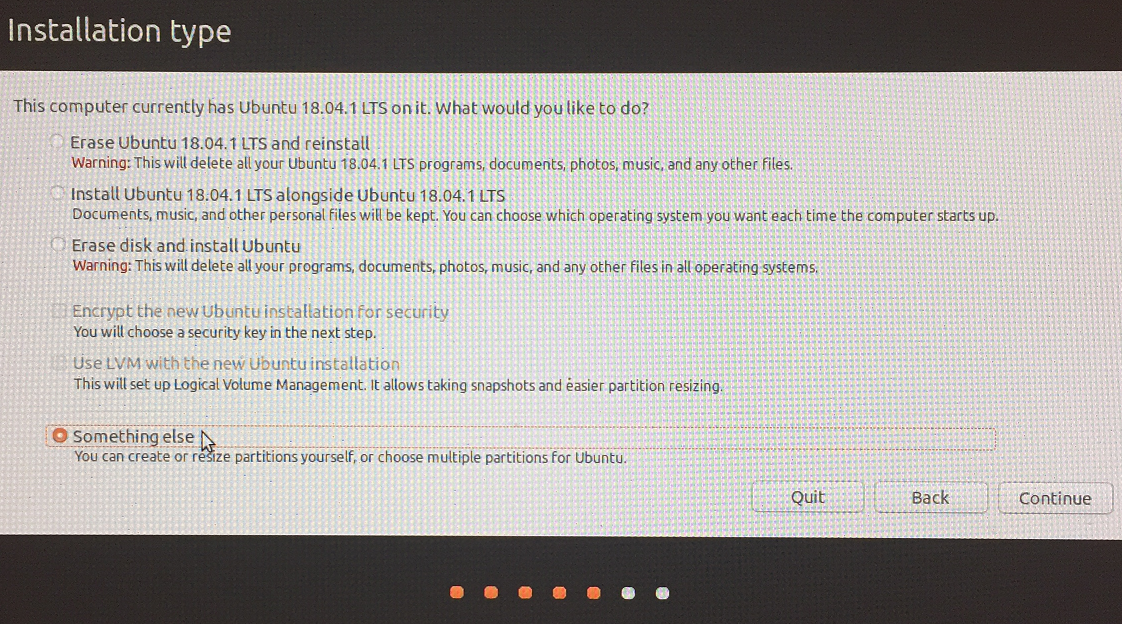
Choose ‘Something else’ as this will give us the most control over installation. Click ‘Continue’ and off to the next screen:
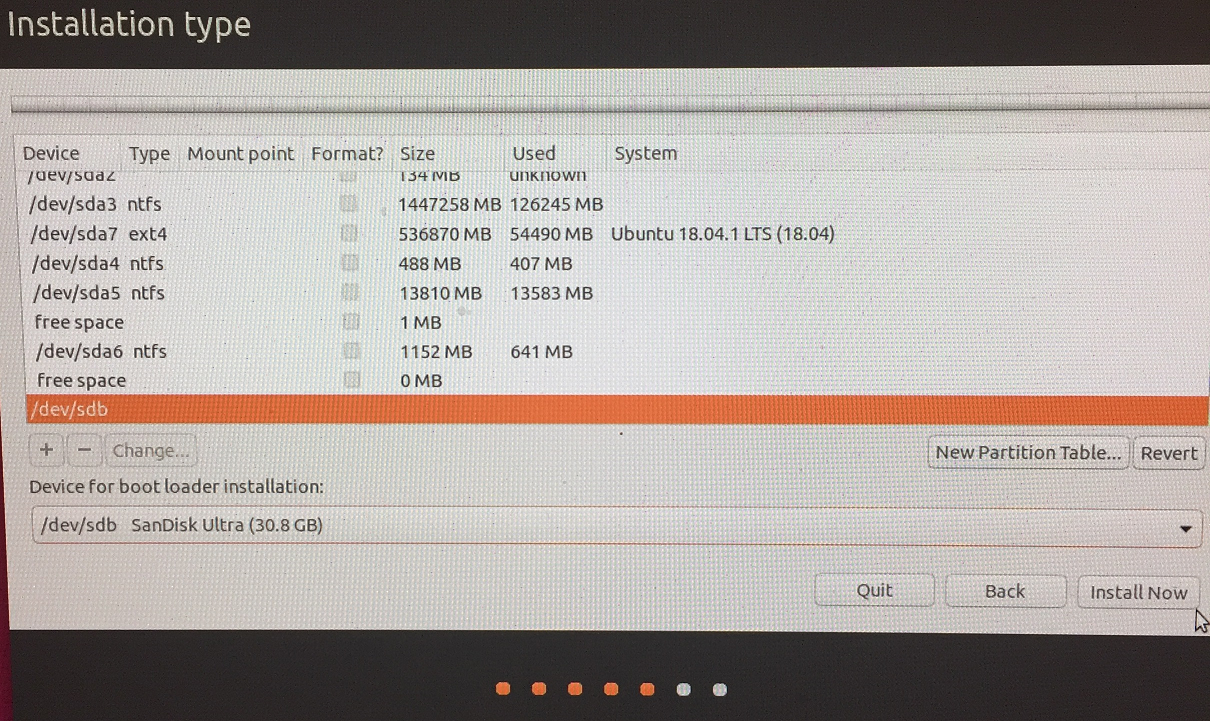
BE CAREFUL! You can install over any device shown. This includes your computer’s boot drive and OS. So, don’t do that. Instead, select your second USB drive that we want to install full Ubuntu on. It will probably be /dev/sdb or thereabouts depending on any other USB drives you have plugged in. Select your second USB in both the device list top panel and the boot loader drop down. Click ‘Install Now’ and install begins. When install has completed remove the USBs and go through a shutdown. Try out your new full Ubuntu USB and make sure things are working. Do some updates to the Ubuntu OS, etc.
Reboot back to your original system and we will do some copying of your new full Ubuntu USB.
Making Copies by Cloning
You should be all booted up into your OS with VMware Player installed. Go ahead and fire up the player. When your Ubuntu VM is running insert your full Ubuntu USB and mount it to the VM.
We are now ready to copy or rather clone the USB drive. The process of cloning will clone the entire drive with all partitions include boot information. This is why earlier I mentioned it is best to have identical USB drives. Identical includes the drive maker. The reason why is that not all 8GB USB drives have the same amount of available space. This means, cloning from 7.96 GB image to 7.95 GB USB will fail. If your second USB is larger than the clone image then you should be just fine.
Anywho, it is time to clone. Navigate to where you would like to clone the USB image to like ~/Documents for example. Now, determine the USBs device identifier using Disks application we used earlier . Should be something like /dev/sdb. And now we clone from the USB to an image on the VM’s disk. In a terminal run the following:
While the clone happens let me explain the above command. We are cloning from device ‘if’ to image ‘of’ and we want to see the status so we add status=progress. The other parameters are data rate and cloning options.
When cloning is complete you will have an image of the fully bootable Ubuntu OS. We can now make as many copies to USBs as we need. To copy a clone to a USB is quite simple. Assuming your USB to copy to is /dev/sdb then in a terminal run the following:
This could have been a bumpy road for some of you but if you made it this far you have created a repeatable process to make many copies of Ubuntu USBs. Congratulations to you as this is a fairly advanced guide.
If you found this guide helpful please think of providing a donation.
Resources
Here are helpful resources used to make this guide.
So, you want to get into coin mining but are a bit awash in all the information out there. How to just get started with a basic OS platform to build on can be challenging. Fear not, I think I can help.
We will be using Ubuntu 18.04 a.k.a. Bionic Beaver as our base OS. A few reasons for choosing Ubuntu. Ubuntu is lightweight, fast, software installs/ downloads are simple, it fits on a USB stick, and mining software runs very well on Ubuntu. If you do not have Ubuntu or would like to make a bootable Ubuntu USB stick, no problem. Check out my article here.
To start, I would suggest using a bootable Ubuntu USB stick. This will isolate mining from the rest of your valuable day-to-day computer OS. Also, you can now boot into a miner on any computer. So, when your buddy asks if it will work on her computer you can boot that baby up and get to mining. You know, because your buddy has a rocking CPU and GPU that they employ to kick your butt in Fortnite. “Yah, but how does it mine?”, you ask.
At this point, it is my assumption you have Ubuntu 18.04 setup and ready to go. Ready also means the OS is fully updated. Next steps are to load on some common software used in mining.
Common Software
Okay, let’s get some common software. The following will provide the abilty to download from code repositories, build code, and text edit config files. Not to mention you will be one step closer to a nerd. Its okay, embrace the inner nerd. In a terminal run:
Mining utilizes both CPU and GPU processing power. CPU we got covered but we need to install the GPU libraries. These are CUDA for NVIDIA GPUs and OpenCL for AMD GPUs. We will add both because you never know if you will have a system change or want to run on another system entirely. So, let’s cover all the bases.
We will start easy with the AMD GPU library for OpenCL. In a terminal run:
Now for NVIDIA CUDA 10. This is a bit more step by step. Navigate to a location in Ubuntu you would like to perform the download and install. Somewhere like ~/Downloads for example.
Mining software makes a few assumptions. One is that Ubuntu has the ability to utilize hugepages. Hugepages allows for larger memory allocation in the CPU. Here is more on hugepages for more reading if you wish.
First, check to see what the hugepages is set at for your current user. In a terminal run:
/sbin/sysctl vm.nr_hugepages ; ulimit -l
If the result is vm.nr_hugepages = 0 then hugepages is not on. We will now enable hugepages. In a terminal run:
nano /etc/sysctl.d/60-hugepages.conf
This opens the hugepages config file in Nano editor. Add the following to the file:
vm.nr_hugepages=128
To have Nano save the changes type ctrl-O and the return key to approve saving the file. To leave Nano type ctrl-X.
Note: on larger CPU threaded machines you may set as 256. For, example an AMD Ryzen Threadripper 1920x.
We still have some more memory configuration to do. Next is memlock. In a terminal run:
sudo nano /etc/security/limits.d/60-memlock.conf
This opens the memlock config file in Nano editor. Add the following 2 lines to the file:
* - memlock 262144
root - memlock 262144
To have Nano save the changes type ctrl-O and the return key to approve saving the file. To leave Nano type ctrl-X.
Now reboot. When you return open a terminal and enter the following:
/sbin/sysctl vm.nr_hugepages ; ulimit -l
You should see a response similar to:
vm.nr_hugepages = 128
262144
That’s pretty much all there is to creating an Ubuntu base to put mining software on.
Some miner suggestions: CPU Miner (easy) – Webchain Miner CPU/ GPU Miner (advanced) – XMR-STAK